Securing shared folders in Windows NT, 2000 & XP
It is good practice to secure any folders that you share for access over the network. It is a simple process and helps prevent the spread of viruses and minimises the risk of your such shares being abused.
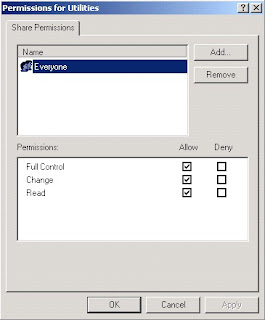
By default when you create a shared folder the group 'Everyone' is given permission to access that folder. This is very insecure as the Everyone group means exactly that - anyone who can access the network has permission to see what is in your shared folder, can edit the material you have stored there and can save anything that they like to it.
Although you may believe that because people do not know it exists they will not find your shared folder this is not true. There are simple tools available for identifying network shared folders, and many viruses now search for shared folders and then attempt to use the folders they find to duplicate themselves. However by following the information below you can secure your shared folders.
Under Windows 95 /98 the sharing process is different - all users have to be specifically added i.e. the Everyone group is not added by default, so the same risk does not occur. However we would recommend that access to shares is limited to only those people or groups who specifically require it.
To secure a shared folder:
Before you start, decide on who will need access to the shared folder that you have created. Access can be to either individual users by login name, or to groups of users - these are the same as those available in Outlook, however you can only use centrally defined groups. So you can choose to have either a number of specified colleagues or a relevant group e.g. your departmental staff group, or a combination of both. We would advise the use of groups where possible, as this leads to easier management, and that access should be kept to the minimum required, to reduce risks.
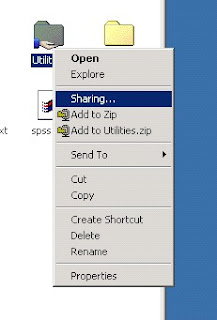
Open Windows Explorer or My Computer and locate the folder you wish to secure. Shared folders can be identified by the hand underneath them - in this example the Utilities folder.
Right click on the folder and select the 'Sharing' or 'Sharing and Security' option from the list provided
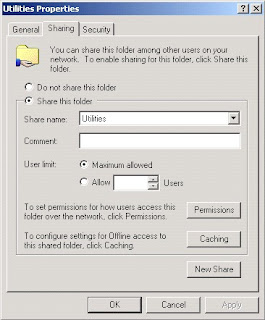
You will now see a dialogue box similar to the one below (they vary with operating system), giving information about the shared folder. Click on the 'Permissions' button
NB. If you have not shared the folder before you will need to click on the 'Share this folder' radio button and then select a share name for the folder - by default this is the same as its local name. By adding a $ sign after the name (e.g. Utilities$) the folder will not be openly visible on the network.
A new window (Share Permissions) lists the users or groups of users who can access the share you have created, by default this is the Everyone group.
Click on the Add button and in the lower window type the names of the users / groups that you wish to limit access to - separated by a semi-colon. If you are not sure of the names you can use the upper window to browse for them, check that the 'Look in' box is set to essex or Entire Network first.
In this case we are going to grant access to Computing Service Staff (serstaff) and Keith Brooke (kbrooke).
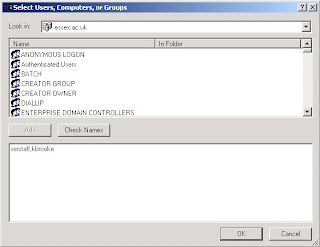
Click on OK.
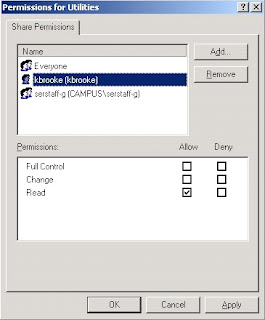
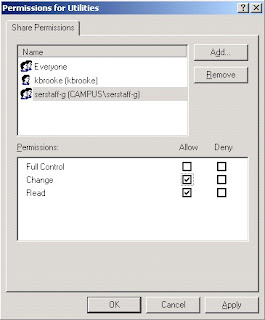
The Share Permissions window now contains the added users. You can now use the lower portion of this window to modify what the people you have granted access to are able to do.
In this case I want to only allow Keith to read the material in the folder, so having selected Keith in the top portion I confirm that only the Read box is checked in the lower portion. I also want to limit Service staff to being able to modify material (they cannot create new material or delete existing material), so again I select them in the top portion and now ensure that the Change and Read boxes are checked.
Please note that the boxes offered in the lower portion of the window maybe different with your operating system but they can be used in the same way.
Finally you need to remove the Everyone group. Select it and then click the remove button.
Access to share is now restricted.


 Note: You need to have administrative rights in order to enable these two options.


