Showing posts with label Windows 7. Show all posts

Wednesday, December 8, 2010

MCSA/MCSE Self-Paced Training Kit (Exam 70-291)


MCSA/MCSE Self-Paced Training Kit (Exam 70-291)
Pages: 1120 | PDF | Size: 11,4 MB

Announcing an all-new MCSA/MCSE Training Kit designed to help maximize your performance on Exam 70-291, a core exam for the new Windows Server 2003 certification. This kit packs the tools and features that exam candidates want most—including in-depth, self-paced training based on final exam content; rigorous, objective-by-objective review; exam tips from expert, exam-certified authors; and a robust testing suite. It also provides real-world scenarios, case study examples, and troubleshooting labs for skills and expertise that you can apply to the job.

Focusing on network infrastructure management for Windows Server 2003, this official study guide covers topics such as implementing, managing, and maintaining IP addressing, name resolution, network security measures, routing and remote access, and monitoring and troubleshooting network infrastructure.

Ace your exam preparation and ramp up quickly on Windows Server 2003 by working at your own pace through the lessons, hands-on exercises, and practice tests. The flexible, best-of-class test engine on CD features 300 practice questions and pre-assessment and post-assessment capabilities. Choose timed or untimed testing mode, generate random tests, or focus on discrete objectives or chapters, and get detailed explanations for right and wrong answers—including pointers back to the book for further study. You also get a 120-day evaluation version of Windows Server 2003 and a 15 percent exam discount voucher—making this kit an exceptional value and a great career investment.

Download Link

Wednesday, November 17, 2010

The Complete Guide To Windows 7


The Complete Guide To Windows 7
English | 112 pages | PDF | 24.00 Mb

Windows 7 is already Microsoft's most popular operating system so far, achieving a faster adoption rate than either Windows XP or Vista. In this guide you will find advice to get the best from your PC & Laptop. Plus in depth coverage to every feature. 110 pages of advice  and tips. A valuable guide to have.

Download Link

Tuesday, November 9, 2010

Windows 7 Desktop Administrator


Windows 7 Desktop Administrator
MCITP Self-Paced Training Kit (Exam 70-686): 
 592 pages | PDF | 22 MB

Announcing an all-new SELF-PACED TRAINING KIT designed to help maximize your performance on 70-686, the required exam for the MCITP: Windows 7, Desktop Administrator certification. This 2-in-1 kit includes the official Microsoft® study guide, plus practice tests on CD to help you assess your skills. It comes packed with the tools and features exam candidates want most-including in-depth, self-paced training based on final exam content; rigorous, objective-by-objective review; exam tips from expert, exam-certified authors; and customizable testing options. It also provides real-world scenarios, case study examples, and labs to build the skills and expertise you can use on the job. 

Topics include planning and managing a client life-cycle strategy, designing a standard image and client configurations, planning Windows 7 client deployment, managing application compatibility, and identifying and resolving issues with deployment and configuration. Work at your own pace through the lessons and lab exercises. Then assess yourself using the 200 practice questions on CD, featuring multiple customizable testing options to meet your specific needs. Choose timed or untimed testing mode, generate random tests, or focus on discrete objectives. You get detailed explanations for right and wrong answers-including pointers back to the book for further study. You also get an exam discount voucher-making this kit an exceptional value and a great career investment.

Monday, September 6, 2010

ComputerActive - September 2010


ComputerActive - September 2010
-The Ultimate Guide to Windows 7
PDF | 98 pages | English | 32.1 MB

The Ultimate Guide to Windows 7 - Plain English & Jargon-Free.
The Ultimate Guide series is published monthly, with each issue focusing exclusively on one topic.

Download Link

Wednesday, March 3, 2010

The Complete Windows 7 Shortcuts

The Complete Windows 7 Shortcuts 
 43 Pages |  PDF | 1 MB

Windows 7 includes a lot of new keyboard shortcuts that are unknown for a new user. This eBook comprises of more than 200 keyboard shortcuts containing almost all the keyboard shortcuts that are available in Windows 7 and its default programs. Keyboard shortcuts are amalgamation of two or more keys that when pressed together performs a task that would typically require a mouse or other pointing device. Keyboard shortcuts can make it easier to interact with your computer, saving your time and effort when you work with Windows and other programs.

Download Link

Monday, January 25, 2010

Seven Tips & Tricks For Windows 7

Shuffling Through Program Windows. If you’re running a number of files from the same program, such as multiple documents in Microsoft Word, Windows 7 allows you to switch through these windows with ease. Simply press down on the Ctrl key while clicking the icon from the taskbar. Each click will change the window to the next in the sequence, in the order that
you opened them.
Managing Your Windows. Windows 7 simplifies document and program management by allowing you to “dock” a window or manipulate its size with one mouse maneuver or a simple keystroke. To dock your window on one half of the screen, drag it to the left or right and it will change its size to fit that half of the screen. To manipulate the vertical size of a window, drag the window to the top to maximize it, or double-click the window’s top or bottom border to maximize it vertically while keeping the same width.

You can also perform all of these functions with keystrokes:
W7+Left Arrow and W7+Right Arrow dock to half the screen
W7+Up Arrow and W7+ Down Arrow maximize and minimize
W7+Shift+Up Arrow and W7+Shift+Down Arrow maximize
and restore vertical size.
W7 = windows emblem left bottom corner of your screen
Project Your Display With Ease. Plugging in a projector and projecting your display is a snap with the Windows 7 driver display utility, displayswitch.exe. Simply hit w7+P to display the following easy-to-navigate pop-up window: By hitting your arrow keys (or w7+P) you can switch through multiple display settings, such as “clone”, “extend” or “external only.”
W7 = windows emblem left bottom corner of your screen
Multi-Monitor Window Management. Windows 7 makes using multiple monitors as convenient as it should be. When you’re working in multi-monitors, use the keyboard shortcuts w7+Shift+Left Arrow and w7+Shift+Right Arrow to toggle between monitors. The new window
will keep its relative position to the top-left origin of the original.
Aero Peek Your Desktop. A lesser-known versatile tool introduced with Windows 7 is the Windows® Aero® feature, “Aero Peek”. Just click the rectangle in the lower right hand corner of the task bar for quick access to your desktop. The keyboard shortcut w7+Space performs the same function.
Live Clutter-Free. We live with enough clutter in our lives. Windows 7 gets rid of all the superfluous windows behind your active window. Just hit w7+Home to minimize all inactive windows. To restore the windows when you’d like them, just press w7+Home again.
Help the Help Desk Help You. Solving problems unique to a machine can be an arduous task for both the end-user and the help desk. That’s why Windows 7 introduces the Problem Steps Recorder, a screen-capture tool that allows the end-user to record the problems they’re having step-by-step. It’s as simple as hitting “record” then adding in comments as needed. A HTML-based file is converted to a .ZIP folder, which is easily passed on to the help desk.
The program is accessible from the Control Panel under “Record steps to reproduce a problem” or run psr.exe from Explorer.


Wednesday, January 6, 2010

Which services can I disable in Windows?

Which services can I disable in Windows?

A:
First, you will want to have a restore point already created, so I will wait here while you do that, in case you haven't already done so.

Done? Okay, great, let's get going on disabling some of the services on your computer so you can save some disk space and allow your computer to run a little bit smoother.

First, click Start, Control Panel. Now, choose the Administrative Tools link (XP users will have to click on "Performance and Maintenance" first, then "Administrative Tools", Windows Vista and 7 users need only type "Administrative Tools" into their search bar). Once there, click on Services and a list of all the services installed on your computer will come up. You can maximize the window, so you can see the status of each service.

The first column contains the complete description of the service. Run your mouse pointer over the words so you can see the whole description written out. The next column is the status of each service. If it says "Started," that means that particular service is presently running. Next, you see the Startup Type, which tells you if the service starts automatically when you boot up your computer or if it has to be done manually. Some services may also be disabled. The next column is just telling you how you logged on for each service, whether it be through your local system or by a network service.

Now, we're getting to the good part. The following services are ones that can be safely disabled, while still allowing your computer to run normally. Disabling some of these services will help you save some of your disk space, which is always a great thing!

Disabling a service is pretty easy to do, but do it with caution as to make sure you don't hit the wrong thing. Just highlight the service you want to turn off and right click on it, choosing "Properties". A service sheet will come up for that service and you'll want to look under the general tab. Here, you can choose to stop the service or turn it back on (either automatically or manually). If you have XP, once you highlight the service, blue links will show up off to the left that say Stop or Restart the service. You can click on those to do the same thing as going into the Properties menu.

Okay, here's the list you've been waiting for:

Alerter: Only alerts you of administrative alerts. You don't need them.

Application Management: Processes installation requests for Intellimirror programs. Don't even know what those are? That's why you can disable it.

ClipBook: Allows ClipBook Viewer to store information and then share it with remote computers. You don't really need to do that, do you?

Computer Browser: Works with networks and if you don't have a network, you don't need it.

Distributed Transaction Coordinator: Works with databases, message queues and file systems of networks. Once again, if you don't use a network, you can disable this.

Error Reporting Service: All this does is send a crash report to Microsoft. They don't need to know, do they?

Indexing Service: Indexes files and provides quick access to those files. This is another network use, so you can disable it.

Internet Connection Firewall (ICF): Involves Internet Connection Sharing and is just another network use.

Logical Disk Manager/Logical Disk Manager Administrative: This service deals with adding drives to your system. If you're not going to be doing that, you can disable this one.

Machine Debug Manager: Works with Visual Studio debugging. You probably won't use it.

Messenger: Sends Alerter messages between the clients and servers. Another network service you probably won't need.

Net Logon: Account authentication for network domains. Don't need this one either.

NetMeeting Remote Desktop Sharing.Network DDE DSDM: Allows other authorized users to access your computer through NetMeeting. Once again, if you don't have a network or have no need to allow other users on your computer, you can disable this one.

Remote Desktop Help Session Manager/Remote Access Auto Connection Manager: This one is the same as the above.

Secondary Logon: Enables starting processes under other credentials, which is not necessary.

SSDP Discovery: Locates UPnP devices on a home network. Sound confusing? That's why you can disable it.

TCP/IP NetBIOS Helper: You'll only need this if you use NetBIOS for a local network.

Telnet: Allows remote users to log on to your computer and run programs. I'm sure you don't want other users to be able to telnet into your system, do you? Disable it!

Terminal Services: Gives access to other users to be connected to one basic machine, as well as, desktop displays and other applications. You can shut this one down.

Themes: If you don't use desktop themes, you don't need this one. If you do, keep it going.

Windows Time: Synchronizes all systems on a network time.

Workstation: Same as above.

Whew, that's a lot, huh? Just keep in mind that these are just suggestions and you don't have to turn off some of these services if you don't want to. Especially don't turn them off if you think you're going to be needing them again someday. But, at least going through the list of your services will help you to determine what's running on your computer that may not need to be. You may be surprised at all you can turn off to save you some computer space.

Note: Make sure you do not turn off any services that are not on this list unless you are an advanced user and you are certain that turning them off will not hurt your computer's operation.

Thursday, December 17, 2009

Microsoft Windows 7 Your Way


Microsoft Windows 7 Your Way:
Speed Up and Customize Window
Want to make Windows 7 run faster, smarter, easier, better? Want to personalize Windows to look and act the way you want it to? Want to get more efficient and ditch all those Windows hassles? You don’t need a Ph.D in computer science or expensive upgrades. All you need is this book!

Michael Miller makes it easy to tweak Windows so it works just like you want it to–and runs smooth as silk for years to come. No extreme hacking required: These are simple, step-by-step techniques anyone can perform in minutes–even beginners!

- Customize Windows 7’s desktop for the way you work
- Strip out bloated, worthless software that slows your PC down
- Get your network running faster and more reliably
- Surf the Web more quickly and safely
- Improve performance and battery life on notebooks and netbooks
- Get more security with fewer annoyances
- Discover great free and cheap alternatives to Microsoft’s built-in software
- Fix Windows 7’s most aggravating problems
- And much more...

Michael Miller has written more than 100 non-fiction how-to books over the past 20 years, including Que’s Absolute Beginner’s Guide to Computer Basics, Speed It Up! A Non-Technical Guide for Speeding Up Slow Computers, and How Microsoft Windows Vista Works. His books have sold more than 1 million copies worldwide. He has earned a reputation for clearly explaining technical topics to non-technical readers and for offering useful real-world advice about complex topics.


Web-Centric Virtual Computer (VC) Operating Systems: Is it the Future?


Web-Centric Virtual Computer (VC) Operating Systems: Is it the Future?

The idea of a primarily cloud-centric OS is nothing revolutionary; the earliest examples date back to 1999. And although numerous other attempts at developing Web-centric OSes none up to this point have truly broken into the mainstream. But some current offerings present welcome alternatives to mainstream operating systems, packing in useful features and making it easier to access your online content.

Unlike a physical computer, your Virtual Computer (VC) is "hosted" in a professional data center somewhere in the Internet "cloud" and is accessible as a web page in any browser. You can run the entire VC from any Internet browser without the need to install any software or "sync" files. Just enter your username and password, and continue using your VC from exactly the state you last left it in.

G.ho.st

G.ho.st offers every person in the world a free Virtual Computer (VC). G.ho.st is simply pronounced "ghost", an acronym of Global hosted operating system (written G.ho.st with two dots because a URL (web address) must have dots!). The G.ho.st Virtual Computer includes almost everything you would have in a physical computer - a desktop, file storage (like a disk drive) and applications (apps).


G.ho.st is revolutionizing personal computing by delivering to you a free Virtual Computer - personal computing in a web page, free of charge. For the first time in history, G.ho.st frees you from being tied to any one physical device - and frees you from the worries of installing software, backing up, and other administration.


Clurrently in beta, Cloudo is described as offering everyone a "free of charge computer" as it lets "every computer, in school, at work, at your friends' or even in the library" become your own. That is, Cloudo lets you log in to your user account from any location. Cloudo is also reasonably flexible: you can skin the user interface (UI), and developers can also develop their own applications for the platform.


Cloudo is expected to officially launch next year, but you can try the beta right now for free.

Glide

Now at version 4.0, Glide, included in our list of the Top 100 products of 2009, syncs your online desktop to your mobile device, allowing for a fairly constant connection to your data.


This Flash-based Web desktop supports multiple users, just like your home PC, and offers an impressive 20GB's of cloud storage, all without any ads.

Jolicloud

A project which started in the summer of 2008, Jolicloud is currently an invitation-only affair. Jolicloud is targeted specifically at netbooks, much like Chrome OS will be. A wide range of compatible devices can be found on the Jolicloud website, and the list is growing.


The idea behind Jolicloud is to create a more "organic" OS, removing the need for costly software with Web alternatives.

You can follow Jolicloud's progress on Twitter.

EyeOS

EyeOS is one of the most established cloud-centric OSes, having been around since 2005. Since its launch the open-source cloud computing OS has gone on to gain support from various companies and organizations
as users.

With a wide range of bundled software--including office software and a development environment--EyeOS is a great alternative to Chrome OS. You can try it now here.

Windows4All

We're not to sure what Microsoft would make of this one. Powered by Silverlight, Windows4All mimics the desktop environment of Windows 7.


Offering many of the basic programs that ship with the real deal, such as Paint, Notepad and Solitaire, Windows4All is more of an experiment rather than a legitimate Web OS. Either way it still makes for an interesting in-browser experience.

This makes up just a few of the currently available web-OS'. If you try any or are using any, then be sure leave your recommendations and comments below!


Thursday, December 10, 2009

Teach Yourself Visually Windows 7


Teach Yourself Visually Windows 7
A practical guide for visual learners who are eager to get started with Windows 7

Windows 7 is Microsoft's highly anticipated operating system used by millions of people around the world. If you're a visual learner and are new to Windows 7, then this book is an ideal introduction to the new features of this operating system. Seasoned author Paul McFedries walks you through the basics and beyond of Windows 7 in a straightforward manner.

You'll discover how to install and repair programs, maintain your system, set up password- protected accounts, load images from a digital camera, play music and other media files, secure Internet and e-mail accounts, and much more. More than 150 tasks are accompanied by full-color screen shots as they guide you to becoming a confident user of Windows 7.
- Experienced author Paul McFedries walks you through Microsoft's eagerly awaited new operating system: Windows 7
- Clear and succinct explanations, step-by-step instructions, and full-color screen shots take you through the newest features of Windows 7
- More than 150 Windows 7 tasks show you the basics and beyond, including installing and repairing programs, maintaining your system, loading images from a digital camera, and more
This book is essential if you are a visual learner who is enthusiastic about diving in and exploring all that Windows 7 has to offer!


Wednesday, December 2, 2009

Windows 7 Pocket Handbook


Windows 7 Pocket Handbook
Learn the basics of Windows 7 and apply them to customize your PC and work more efficiently. More than 300 pages of tip, secrets and techniques enabling you to use Windows 7 faster and easier.


Monday, November 16, 2009

Windows 7 Secrets


Windows 7 Secrets

Tips, tricks, treats, and secrets revealed on the latest operating system from Microsoft: Windows 7
You already know the ups and downs of Windows Vista–now it?s time to learn the ins and outs of Windows 7! Internationally recognized Windows experts, Microsoft insiders, and authors
Paul Thurrott and Rafael Rivera cut through the hype to pull away the curtain and reveal useful information not found anywhere else. Regardless of your level of knowledge, you?ll discover little–known facts on how things work, what?s new and different, and how you can modify Windows 7 to meet your own specific needs.

A witty, conversational tone tells you what you need to know to go from Windows user to Windows expert and doesn?t waste time with basic computer topics while point–by–point comparisons demonstrate the difference between Windows 7 features and functionality to those in Windows XP and Vista.


Sunday, November 8, 2009

Windows 7 Tips and Tricks E-Book


Windows 7 Tips and Tricks E-Book

If you are looking for Windows 7 Tips & Trcks, Microsft has the Solution of Your Problem. Microsoft Partner Programme UK launched a new Ebook on Windows 7 Tips and Ticks. Windows 7

Ebook” provides tips, tricks and guide to master the Windows 7 operating system. The books cover every topics related to using Windows 7, with contents from as basic as starting computer and using keyboard and mouse and various options.


Friday, October 30, 2009

How to Upgrade Windows Vista to Windows 7

How to Upgrade Window Vista to Windows 7

Depending on your hardware and your current edition of Windows Vista, you can use the Upgrade option during Windows 7 installation to upgrade from Windows Vista to a corresponding or higher edition of Windows 7. Upgrading is the most convenient way to get Windows 7 on your computer, because it keeps your files, settings, and programs from Windows Vista in place.

There are 2 ways to Upgrade Windows Vista to Windows 7.

1. Upgrade Installation
2. Custom ( Advanced ) Installation.

So here we Cover the Both of them, but before you have to backup your Hardisk. You’ll need to move your files off of your PC before you install Windows 7. To make this easier, we recommend a free download called Windows Easy Transfer, which will require an external hard disk. They’re readily available at electronics and office supply stores, and they provide an easy way to add additional storage space to your computer.

32-bit or 64-bit: Which version of Windows 7 to install?

Both 32-bit and 64-bit installation discs are included in the Windows 7 package. 64-bit operating systems can handle large amounts of memory—typically 4 gigabytes (GB) of random access memory (RAM) or more—more efficiently than 32-bit operating systems. However, not all computers are 64-bit capable.

To find out which Windows 7 installation disc you can use, click the Start button, right-click Computer, and then click Properties.

* Next to System type you should see either “32-bit Operating System” or “64-bit Operating System.” If you see “32-bit Operating System” listed, then you’re running the 32-bit version of Windows Vista.

* If “64-bit Operating System” is listed next to System type, then you’re running the 64-bit version of Windows Vista and can run the 64-bit version of Windows 7.

Make sure that your programs and devices will work with Windows 7

Since your computer is running Windows Vista, it meets the system requirements to run Windows 7. You should still download and run the free Windows 7 Upgrade Advisor. It helps find potential compatibility issues with your computer’s hardware, devices, or programs that might affect installing Windows 7, and gives recommendations on what to do before you upgrade to improve your PC’s compatibility with Windows 7.

Download and install Windows 7 Upgrade Advisor

Follow the steps below to download the Windows 7 Upgrade Advisor.

1. Go to the Windows 7 Upgrade Advisor webpage.
2. Click Download the Windows 7 Upgrade Advisor.
3. Click Download, and then save the installation file to your PC.
4. Double-click the installation file saved to your PC.
5. If you agree to the license terms, click Install.
6. Click Close.

If you see a pre-selected check box, clicking Close will run Windows 7 Upgrade Advisor.

Run Windows 7 Upgrade Advisor

1. If Windows 7 Upgrade Advisor isn’t already running, double-click the Windows 7 Upgrade Advisor shortcut on your PC’s desktop.

2. In the security warning dialog box, click Yes.

3. Click Start check. The Windows 7 Upgrade Advisor will scan your PC’s hardware, devices, and installed software. This might take a few minutes. When finished, it will provide you with a compatibility report that you can print or save for your reference.

4. Read the report carefully, and make note of any issues that the Upgrade Advisor finds and what the recommended steps are to fix these issues.

5. If you want to save the report and print or refer to it later, click Save Report, type a name in the File Name box, and then click Save.

6. Click Close.

You can scan your PC more than once. We recommend running the Windows 7 Upgrade Advisor again after taking any of the recommended steps or making any changes to your PC’s hardware, devices, or installed software before upgrading to Windows 7. Be sure to save your updated report.

Now Here is the Main Step. As we mention Above you can Upgrade windows Vista with 2 steps Upgrade Installation and Custom ( Advanced ) Installation. So here is the descriptions:-

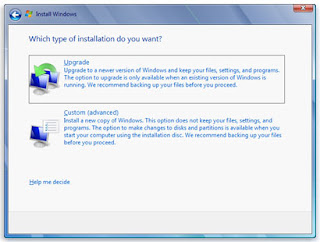
1. Upgrade Installation

When you upgrade to Windows 7, you keep your files, settings, and programs from Windows Vista.
1. Turn on your PC.

2. After Windows Vista has started, do one of the following:

* If you purchased and downloaded Windows 7 online, open the installation file. Purchasing and downloading Windows 7 online is the easiest way to install Windows 7 on a netbook.
* If you have a Windows 7 installation disc, insert the disc into your computer. Setup should start automatically. If it doesn’t, click the Start button, click Computer, double-click your DVD drive to open the Windows 7 installation disc, and then double-click setup.exe.

3. On the Install Windows page, click Install now.

4. On the Get important updates for installation page, we recommend getting the latest updates to help ensure a successful installation, and to help protect your computer against security threats. You computer will need to be connected to the Internet during Windows 7 installation to get these updates.

5. On the Please read the license terms page, if you accept the license terms, click I accept the license terms, and then click Next.

6. On the Which type of installation do you want? page, click Upgrade.
You might see a compatibility report.

7. Continue to follow the instructions to finish installing Windows 7.

2. Custom ( Advanced ) Installation.

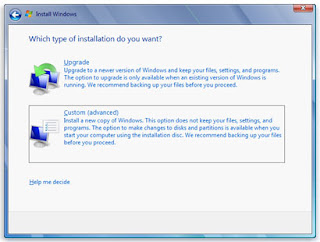
When you choose the Custom option during installation, you install a new copy of Windows on your PC.
1. With your computer on and Windows Vista running, do one of the following:

* If you have a Windows 7 installation disc, insert the disc into your computer. Setup should start automatically. If it doesn’t, click the Start button, click Computer, open the Windows 7 installation disc on your DVD drive, and then double-click setup.exe.

* If you purchased and downloaded Windows 7 online, open the installation file.

2. On the Install Windows page, click Install now.

3. On the Get important updates for installation page, we recommend getting the latest updates to help ensure a successful installation, and to help protect your computer against security threats. Your computer will need to be connected to the Internet during Windows 7 installation to get these updates.

4. On the Please read the license terms page, if you accept the license terms, click I accept the license terms, and then click Next.

5. On the Which type of installation do you want? page, click Custom.

6. Choose the partition containing Windows Vista (this is often the computer’s C drive), and then click Next. (Do not select your external USB hard drive.)

7. In the Windows.old dialog box, click OK.

8. Continue to follow the instructions to finish installing Windows 7, including naming your computer and setting up an initial user account. You can use the same names that you used in Windows Vista, or choose new ones.

Price Details of Windows 7 in India


Microsoft announced the prices for the Windows 7 operating system, which will definitely cost the consumers less when compared to its Vista counterpart. The prices are apparently 40% lower than the US prices.


Here are the Price Details of Windows 7 in India

Windows 7 Home Basic – Rs. 5,899
Windows 7 Home Premium – Rs. 6,799
Windows 7 Professional – Rs. 11,199
Windows 7 Ultimate – Rs. 11,799

Friday, October 9, 2009

The 14 Best Windows 7 Keyboard Shortcuts

The 14 Best Windows 7 Keyboard Shortcuts

The Windows key now performs a wide variety of functions. Here are a handful of the most useful ones:

1. Win+h - Move current window to full screen
2. Win+i - Restore current full screen window to normal size or minimize current window if not full screen

3. Win+Shift+arrow - Move current window to alternate screen
4. Win+D - Minimize all windows and show the desktop

5. Win+E - Launch Explorer with Computer as the focus
6. Win+F - Launch a search window

7. Win+G - Cycle through gadgets
8. Win+L - Lock the desktop

9. Win+M - Minimize the current window
10. Win+R - Open the Run window

11. Win+T - Cycle through task bar opening Aero Peek for each running item
12. Win+U - Open the Ease of Use center

13. Win+Space - Aero Peek the desktop
14. Ctrl+Win+Tab - Open persistent task selection window, roll mouse over each icon to preview item and minimize others

77 Windows 7 Tips

77 Windows 7 Tips

AT A GLANCE:
Make Windows 7 faster
Get more done with Windows 7
The best Windows 7 shortcuts
Securing Windows 7

Windows 7 may be Microsoft’s most anticipated product ever. It builds on Windows Vista’s positives, and eliminates many of that OS’s negatives. It adds new functionality, too—all in a package that is less resource-hungry than its predecessor.
And whether or not you're upgrading from Vista or skipping it altogether and moving up from Windows XP, you'll need to know how to make the most of it in your environment. Here are 77 tips and tricks to get you there.

1. Pick Your Edition. Most business users do not need the more expensive Ultimate Edition; stick with Professional unless you specifically need BitLocker.

2. Upgrading? Go 64-bit. As the second major Windows release to fully support 64-bit, the x64 architecture has definitely arrived on the desktop. Don't buy new 32-bit hardware unless it's a netbook.

3. Use Windows XP Mode. Yes, it's only an embedded Virtual PC with a full copy of WinXP—but it's an embedded Virtual PC with a full copy of Windows XP! This is the first profoundly intelligent use of desktop virtualization we've seen—and a great way to move to Windows 7 without giving up full Windows XP compatibility.

4. Use Windows PowerShell v2. More than just a shell, this is the administration tool you've always wanted: Parallel, distributed processing for administrative tasks! Manage 100 machines literally as easily as you manage one with the new Remoting feature. Windows PowerShell v2 ships for the first time in Windows 7, and within six months will be available for older versions of Windows.

5. Use AppLocker. We've been fans of Software Restriction Policies since Windows XP, and AppLocker finally makes application whitelisting possible. Use it to enhance or even replace your anti-virus software, ensuring that only the software you want to run will run.
6. Shift to and from Explorer and CommandPrompt. The classic Windows power toy Open Command Prompt Here is now an integral part of Windows 7 Explorer. Hold down the shift key then right-click a folder to add this option to the property menu. While you're in a command prompt, if you want to open an Explorer window with the focus of the window on the current directory, enter start.

7. Record Problems. The Problem Steps Recorder (PSR) is a great new feature that helps in troubleshooting a system (see Figure 1). At times, Remote Assistance may not be possible. However, if a person types psr in their Instant Search, it will launch the recorder. Now they can perform the actions needed to recreate the problem and each click will record the screen and the step. They can even add comments. Once complete, the PSR compiles the whole thing into an MHTML file and zips it up so that it can be e-mailed for analysis to the network admin (or family problem solver, depending on how it's being used).


Figure 1 The Problem Steps Recorder dramatically speeds up troubleshooting.

8. Make Training Videos. Use a tool like Camtasia to record short, two to three minute video tutorials to help your users find relocated features, operate the new Taskbar and so forth. Get them excited about Windows 7—and prepared for it.

9. Start Thinking About Windows Server 2008 R2. Some of Windows 7's more compelling features, like BranchCache, work in conjunction with the new server OS. The R2 upgrade path is pretty straightforward, so there's little reason not to take advantage of the synergies if you can afford upgrade licenses.

10. Prepare Those XP Machines. There's no in-place upgrade from Windows XP to Windows 7, so start planning to migrate user data now, in advance of a Windows 7 upgrade deployment.

11. Consider Clean Installs. Even when upgrading Windows Vista machines, consider a clean install rather than an in-place upgrade. Yes, it's more hassle, but it'll produce a more trouble-free computer in the long run.

12. Consider Upgrade Assurance. Even if you've never bought it before, consider it for your new Windows 7 licenses. Access to the Microsoft Desktop Optimization Pack (MDOP), which includes App-V, MED-V and other cool technologies, is worth the premium.

13. Find New Tools. Within Control Panel is a single Troubleshooting link that leads you to all of your diagnostic tools on the system. There are additional tools, however, not installed by default. Selecting the "View all" link in the top left-hand corner will help you to see which troubleshooting packs are local and which ones are online. If you find a tool that you don't have, you can grab it from here.

14. Understand Virtual Desktop Infrastructure (VDI). Windows 7 plays an important role in Microsoft's VDI strategy, where virtualized Windows 7 machines are hosted on a central virtualization server using a special blanket "Enterprise Centralized Desktop" license. Read up and figure out if you can take advantage of this new strategy.

15. Prepare for DirectAccess. DirectAccess makes it easier for users to remotely access their office-based resources, without a VPN. DirectAccess also opens up remote computers more fully to Group Policy—but it requires Windows 7 and Windows 2008 R2.

16. Employ Deployment Image Servicing and Management (DISM). If you quickly want to list or manage Windows packages, features or drivers, use the command-line utility DISM. The "image" in the name may fool you into thinking that this is solely a deployment tool. An online command-line switch lets you manage the features in the currently loaded OS. To get a list of the loaded Windows features, enter dism /online /get-features /format:table. To enable a feature, enter dism /online /enable-feature /featurename:.

17. Embrace Troubleshooting Packs. Designed to help users troubleshoot and solve problems on their own, you need to update your support procedures to acknowledge these Packs. For example, don't force users to repeat steps the Pack already walked them through, and consider developing your own Packs (in Windows PowerShell) to support in-house systems.

18. Check Reliability. The Reliability Monitor was introduced in Windows Vista as 'The Reliability and Performance Monitor." In Windows 7 it has been separated from Performance Monitor and moved to a new location under the Action Center. You open the Action Center in Control Panel and then look under the Maintenance options for the "View reliability history" link. You can also just type in Reliability Monitor from the Instant Search (see Figure 2).


Figure 2 The Reliability Monitor has been broken out separately from Performance Monitor.

19. Accept Diversity. Not every organization will be ready to move entirely to Windows 7 right away. That's fine—but that shouldn't mean the entire organization stays on Windows XP, either. The myths of the cost savings of having only one OS have been largely disproven or downplayed, so use Windows 7 where it makes sense to do so.

20. Get Snippy. The snipping tool has also been around in various incarnations but it's even easier to use in Windows 7. Launch the tool, then drag and drop any part of your screen. The tool will snip the selection. You can save it as a graphic file or annotate with basic drawing tools. Teach your end users how to use this tool so they can grab the snapshots of their problems and send them to the help desk. Or create your own library of visual notes.

21. Presentation Nirvana. Press Windows+P to access the new Presentation mode, and easily turn on your projector and laptop screen at the same time. No more messing with vendor-specific utilities and arcane keystrokes. (Windows+X accesses the Mobility Center, with additional presentation options.)

22. Cut the Clutter. Press Windows+Home to minimize all but the current window, removing background clutter and letting you focus on that report your boss has been bugging you about.
23. Be a Mouse-Click Administrator. Windows 7 makes it easy to gain admin rights with a keyboard shortcut. Click on Ctrl+Shift on a taskbar-locked icon, and voila! You've launched it with appropriate admin rights.

24. Faster Installations. If your computer is capable of booting from USB, try this: XCopy the Windows 7 installation DVD to a sufficiently large USB drive, boot from that drive, and install Windows from there. It's faster than a spinning platter.

25. Burn Discs with a Click. Or two; double-click an ISO file to burn it to your CD or DVD writer.

26. Restore Point Previews Many of us used to shut off System Restore because we were terrified to actually use it; under Windows 7, we can be much calmer. After selecting a Restore Point, Windows will now offer to show you which files and folders will be affected by restoring to that point.

27. Sync Time Zones. If you work with offices in different time zones and frequently find yourself missing meeting times because you are not in sync with their time zone, try the "Additional Clocks" feature that was first introduced in Vista. Within your Date and Time settings is a tab called Additional Clocks, where you can add two or more clocks to your taskbar time, and set them to provide different time zones from your current time zone.

28. Configure User Account Control (UAC). Even if you're a UAC hater, give it another try. Go to the Control Panel to configure its behavior to something slightly less obnoxious than what Windows Vista had, and see if you can't live with the extra protection it offers (see Figure 3).


Figure 3 User Account Control, the bane of administrators, has been revamped and improved.

29. RoboCopyCopyCopy. The always-useful Robocopy.exe can now run multi-threaded; run Robocopy /? to review its new parameters (like /MT for multithreading) and make your copies go faster.

30. Remote Desktop Console. Windows 7 Remote Server Administration Tools (RSAT) does not include a console-based remote desktop utility. And even if it did, the standard remote desktop console has some nagging limitations: It can't move connections around in the list; it can't sort by folders and so forth. If you manage lots of servers from your Windows 7 workstation, try downloading a copy of mRemote from mremote.org. This donation-requested utility allows you to mix together a variety of remote control applications, including Citrix Independent Computing Architecture (ICA), Microsoft Remote Desktop Protocol (RDP), Virtual Network Computing (VNC), Secure Shell (SSH) and rlogin. All host names are displayed in a standard tree control that can be divided into folders, sorted alphabetically, and allow you to assign different logon accounts and secure passwords to each connection.

31. Multiple Monitors. Windows 7 makes working with multiple monitors intuitive and flexible. There are a variety of shortcuts and mouse motions that flick windows from monitor to monitor. To make the most of this, you need lots and lots of screen real estate. Try one of the new QWXGA monitors from Samsung (tinyurl.com/qwxgasamsung) or Dell (tinyurl.com/qwxgadell). These 23-inch monitors have a 2048x1152 resolution, making it possible to put two full-sized pages on the same monitor. Pair them together and you'll get enough space to have all your admin tools open along with Office, Visio, your intranet sites and a little note to your mom in Live Mail. Move your taskbar to the left or right side of the window instead of along the bottom to free up even more real estate.

32. Windows PowerShell Scripting. If you want to make the most of Windows PowerShell on Windows 7, you'll need a quick way to build and debug scripts. Windows 7 comes with an interactive editor that allows you to try out cmdlets and test functions on the fly.

33. Drag-and-Drop Notification Icons. The redesigned notification area displays only a minimum number of icons; all other notification icons are moved to a side window. Rather than using the Customize option to select icons for the main display, you can drag-and-drop icons from the side window to the notification area.

34. Add Unindexed Shared Folders to Library. You can add UNC paths such as \\servername\sharename to a Library, but the server must index the folder. If you want to add a UNC path to an unindexed server, you can create a symbolic link to the UNC path, then add the link or links to the library. Use the mklink command. For example, mklink HomeFolder \\ServerName\Homefolder.

35. Simplify Cloned Machine Setups. You can't run Sysinternals' newsid utility to change the identity of a cloned Windows 7 machine (either a virtual machine or imaged PC). Instead, create a template installation then run sysprep /oobe /generalize /reboot /shutdown /unattend:scriptfile. Clone or copy this virtual machine file. When it launches, it will get a new SID and you can fill in the name. The reference for building unattended script files is at tinyurl.com/winunattend.

36. Snap That Aero. The Windows key is great for all your shortcuts. Now you can use it to work with the new AeroSnap feature in Windows 7. Select a window, hit the Windows key and a left or right arrow to snap the window to that half of the screen, or use the up arrow to snap it to the top of the screen.

37. Shortcut the Taskbar. The Windows key is great for shortcuts. You can select the Windows key and a number to correspond to items on your taskbar. So, if IE (for example) is the third icon on your taskbar (not counting the Start button), you can hit the Windows key and the number three to launch or open IE.

38. Manage Passwords. Control Panel includes a new application called Credential Manager. This may appear to be a completely new tool that allows you to save your credentials (usernames and passwords) for Web sites you log into and other resources you connect to (such as other systems). Those credentials are saved in the Windows Vault, which can be backed up and restored. However, you might see this as similar to a tool we have in XP and Vista. From the Instant Search, type in control /userpasswords2 and you will be brought to the Advanced User Accounts Control Panel, where you can also manage passwords for your account (see Figure 4).


Figure 4 The Credential Manager provides a handy, secure place to store passwords.

39. Trigger Actions. Event Viewer is closely tied into Task Scheduler. You have the ability to take an event (select it in Event Viewer) and then from the Actions pane, select the option "Attach a Task" to have that event, when it appears, trigger an action. That action can be: launch a program; send an e-mail; or display a message. This feature may be very helpful in troubleshooting a problem.

40. Browse InPrivate. A new feature in IE8 is the ability to open the browser in an InPrivate Browsing session that allows you to perform banking and so forth from a public location without fear of leaving behind any residue. IE will not retain anything you do in an InPrivate Browsing session. You can perform this action if you are already within IE by selecting the Safety button and then InPrivate Browsing. This will open another IE window altogether. However, you can save a few steps by using the shortcut. Right-click the desktop IE icon, click InPrivate and the windows will open in an InPrivate session already.

41. Go Live. Many applications installed on past versions of Windows have been removed. Starting with Windows 7, these applications (and a few others not typically installed with Windows) have been moved into the Live Essentials downloadable applications, at download.live.com. These applications include Messenger, Mail, Writer, Photo Gallery, Movie Maker, Family Safety and a few others.

42. Remove Apps. Although some applications have been moved off of Windows to become an optional download, other apps, such as IE8, Media Player, Media Center and DVD Maker are still included. In times past, especially when it came to IE, the applications were tied into the OS. However, in Windows 7 you can easily remove them if desired. Head to the Program and Features applet in Control Panel and select the "Turn Windows features on or off" link in the top left-hand corner. Then you can select the checkbox of the features you want to lose or add for your system (see Figure 5).


Figure 5 Windows 7 unbinds many applications from the OS, making it easy to add and remove them.

43. Are You Windows 7 Experienced? System properties has a rating called the Windows Experience Index (WEI). This rating is a collection of five different ratings that are determined by the Windows System Assessment Tool (WinSAT). The highest rating score is 7.9 (compared to 5.9 in Vista), using the categories of Processor, RAM, Graphics, Gaming Graphics and Primary Hard Disk. The final rating is not an average of all the ratings, but the lowest of the subcomponent scores.

44. Analyze Processes. One of the coolest new features in the revamped Resource Monitor (resmon) is the ability to see the "wait chain traversal." An unresponsive process will be shown in red in the Resource Monitor; right-click the process and choose Analyze Process. This will show the threads in the process and see who holds the resources that are holding up the process itself. You can then kill that part of the process if you like.

45. Create Virtual Worlds. Virtualization capability has been added to the Disk Management tools. If you open Computer Management, go to the Disk Manager tool and then click the Action button at top, you will see the options Create VHD and/or Attach VHD. This allows you to create and mount a virtual hard drive directly from within the GUI. Note: With Windows 7 you even have the ability to boot a Windows 7 VHD (see Figure 6).


Figure 6 Windows 7 adds a great deal of virtualization support, including the ability to create and attach virtual hard drives from the GUI.

46. Encrypt USB Sticks. Use BitLocker To Go. Maybe you've managed to never misplace or lose a USB key, but for the rest of us mere mortals, it's a fact of life. Most of the time it's no big deal, but what if it contains sensitive data? BitLocker To Go enables you to encrypt data on removable storage devices with a password or a digital certificate stored on a smart card.

47. Lock with Group Policy. Take control through AppLocker application control. AppLocker intercepts kernel calls that try to create new processes or load libraries and ensures the code is allowed to execute. Practically, that means you can eliminate unknown and unwanted software by implementing AppLocker through Group Policy.

48. Be Our Guest. Guest mode proves a convenient method to give a guest or child access to your computer with limits on making system changes, installing software, or writing to the disk outside the user profile. After the user is done and logs off, data saved inside of the user profile is deleted. You cannot use Guest mode in an AD environment.

49. Restore from Backed up Restore Points. You can choose to include restore points in your backups and restore from them when using System Restore. This is convenient if you want to create a baseline of a working configuration and be able to restore to it in the future without overwriting other data on the hard disk.

50. Benefit from BranchCache. BranchCache helps you save on round trips for requested files in remote branch scenarios. If one person requests a file over the WAN, it's cached locally and either distributed across computers at the remote branch or stored on a central server at the remote branch.

51. Disable Search Suggestion Popups. As you type in the Search Box, Windows 7 makes suggestions based on past queries by pulling past queries from the Registry. You can disable this in the Local Group Policy by enabling User Configuration | Administrative Templates | Windows Components | Windows Explorer | Turn Off Display Of Recent Search Entries In the Windows Explorer.

52. Pin Control Panel to Taskbar. If you use the Control Panel frequently, you may have noticed that you cannot simply right-click the Control Panel and select Pin to Taskbar. Instead, you must first Open Control Panel so its icon appears in the taskbar. From there, you can right-click the icon in the taskbar and select Pin this program to taskbar.

53. Leverage Search Connectors. You can now search the Web using the search functionality. Windows 7 includes Federated Search to increase the search scope beyond the local and network resources. Several search connectors are available, such as for YouTube and Twitter, or you can create custom ones to fit your needs.

54. Use Stickier Notes. Even though this feature has existed in previous versions of Windows in one form or another, it's much easier to use in Windows 7. You can stick a note on your desktop for quick reminders. It's a snap to change the font or note color. If you have a note selected, use Ctrl-N to create a new one.

55. Try out Improved WordPad. You probably haven't given much thought to WordPad lately, but the version shipping with Windows 7 has undergone a major renovation. Think of it as a lite version of Microsoft Word. WordPad sports a spiffy ribbon interface, making it a snap to create well-formatted documents. Plus, you are no longer relegated to saving them as .RTF files. WordPad now supports the Office Open XML document (.DOCX) format. This makes it even easier to open .DOCX files created in Word in WordPad.

56. Calculate. Another basic utility that received a major overhaul is the venerable calculator. In addition to standard and scientific views, there are now programmer and statistic modes. You will also love the conversion and calculation features. Want to convert Celsius to Fahrenheit but can never remember the formula? Use the conversion panel. You'll also enjoy the data calculation extension. Quickly find the difference between two dates or calculate a new date by adding or subtracting years, months or days.

57. Manage Services from Task Manager. The Windows 7 Task Manager now includes a tab to manage services. You can quickly see at a glance the status of all services on your machine. Click a column heading to sort. You can even start and stop services with a simple right-click. If you need full-blown service management, use the Services button to launch the Services management console. You may often have the Task Manager running in the system tray; now, having service management access means one less window to have open.

58. Get Under the Hood. Windows 7 offers more ways to peek under the hood without adding third-party solutions. A terrific example is the Resource Monitor. The performance tab in Windows Task Manager is a good start, but sometimes you need more information. Click the Resource Monitor button to get more detailed information and performance graphs for key subsystems like CPU and Disk. You can also find the Resource Monitor under Accessories | System Tools.

59. Check Vital Signs. Another new system tool you'll enjoy is the System Health report. In the Run dialog box, type perfmon /report, which generates a system health report. This report records details about your computer's performance, resource usage and more. The report also includes diagnostic information about things that aren't working as they should and suggested steps to resolve. The reports are saved and can be accessed with the Performance Monitor management console. You can also save as an HTML file or send via e-mail.

60. Get More Windows PowerShell. Windows PowerShell v2 promises to be a game-changer for many system administrators. Many will prefer to use the graphical Windows PowerShell console, also known as the Integrated Scripting Environment (ISE). You'll find this in the Windows PowerShell folder under Accessories. Add a keyboard shortcut of Ctrl+Alt+I to quickly launch it. Run any Windows PowerShell command in the lower panel and see the results in the middle. Create or edit scripts in the top pane. Open multiple Windows PowerShell sessions connected to remote computers. The ISE makes Windows PowerShell v2 easy to use and fun (see Figure 7).


Figure 7 Windows PowerShell has been much more tightly integrated with Windows 7, and adds the Integrated Scripting Environment.

61. Put It on Old Stuff. One perhaps-not-so-obvious Windows 7 tip is that you should attempt to install it everywhere. One user has a 6-year-old laptop that originally shipped with Windows XP. He could never get Windows Vista to install on it. But Windows 7 installed without complaint and runs extremely smooth. Granted, there are some Windows 7 features he can't take advantage of because the processor lacks certain features, but these are minor issues considering the laptop now has life again.

62. Improve Security. In Vista it was difficult to manage system protection via restore points. The System Protection tab in Windows 7 is a vast improvement. In one spot you can configure how much space to devote to restore points, delete and create restore points or even turn off system protection altogether. This is very useful on older systems where disk space may be at a premium.

63. Actually Use Help and Support. Much of Vista's clutter has been reduced in Windows 7. For instance, the Help and Support page has three links, a search window and a link back to Microsoft's Windows site. It's much less intimidating for end users, so make sure they know about it. Search is much improved as well, making for a better, faster experience.

-------------------
The 14 Best Windows 7 Keyboard Shortcuts
The Windows key now performs a wide variety of functions. Here are a handful of the most useful ones:

64. Win+h - Move current window to full screen
65. Win+i - Restore current full screen window to normal size or minimize current window if not full screen

66. Win+Shift+arrow - Move current window to alternate screen
67. Win+D - Minimize all windows and show the desktop

68. Win+E - Launch Explorer with Computer as the focus
69. Win+F - Launch a search window

70. Win+G - Cycle through gadgets
71. Win+L - Lock the desktop

72. Win+M - Minimize the current window
73. Win+R - Open the Run window

74. Win+T - Cycle through task bar opening Aero Peek for each running item
75. Win+U - Open the Ease of Use center

76. Win+Space - Aero Peek the desktop
77. Ctrl+Win+Tab - Open persistent task selection window, roll mouse over each icon to preview item and minimize others